How to make the most out of Conditional Formatting on the New UX
In this blog post, Vuealta Consultant, Sean Watson, shares his tips on how to use conditional formatting on the New Anaplan UX, to create a colour-coded view of a customers’ marketing events, aligned with corporate strategic objectives.
For a lot of customers, making the Anaplan UX look like their familiar legacy systems can drastically help the ease of transition and support when adopting a new Anaplan model. However, the granularity and flexibility afforded to colour in spreadsheets and BI tools can often be hard to replicate. Whilst working on a recent customer project, I got the opportunity to explore which new features I could use to help make the most out of Conditional Formatting on the New Anaplan UX.
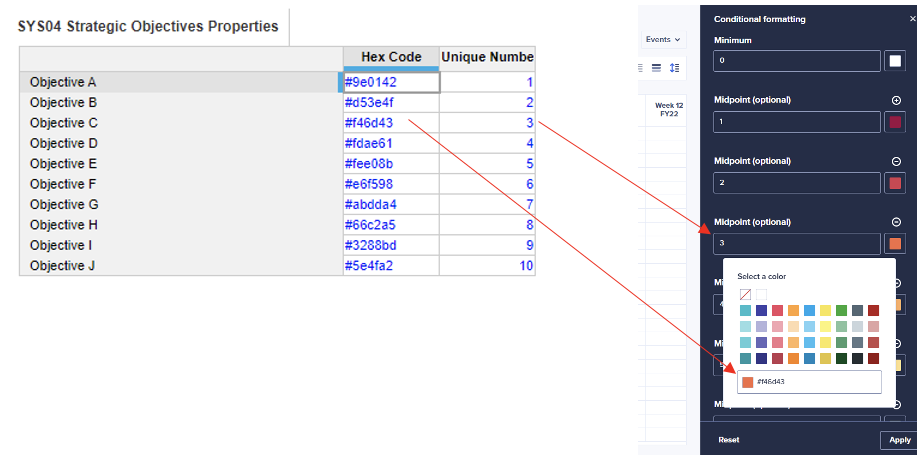
The project involved a marketing use case for a customer who had assigned corporate colours (in the form of hex codes) to each of their Strategic Objectives. They were very familiar with these colours and within their Anaplan solution, they wanted a calendar view where they could easily ensure that their planned Marketing Events aligned with their Strategic Objectives. In classic dashboards and saved views, we can only use conditional formatting with a gradient of up to 3 specified colours. Therefore, to provide the customer with the view they needed, I decided to explore the use of custom views and the new UX. Technical Solution Documentation:
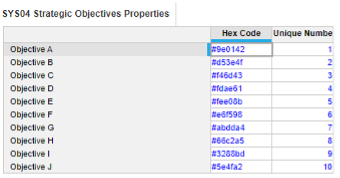
The first step involved creating a List in Anaplan of the Strategic Objectives. Then, in a system module, I stored the hex codes as a text line item and gave each item a unique number, to be used later in the conditional formatting logic.
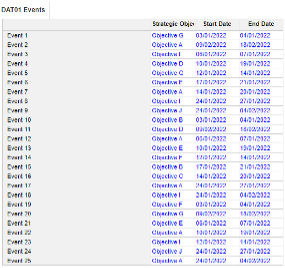
The second step involved mapping each of the planned Marketing Events to the Strategic Objectives – the logic for the mapping was provided by the customer.
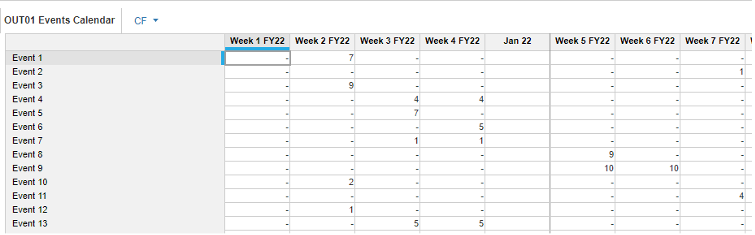
The third step was to create a conditional formatting line item (CFLI) in the calendar module. This was calculated by looking up the unique number in the Strategic Objective system module using the mapping assigned from the Events module.
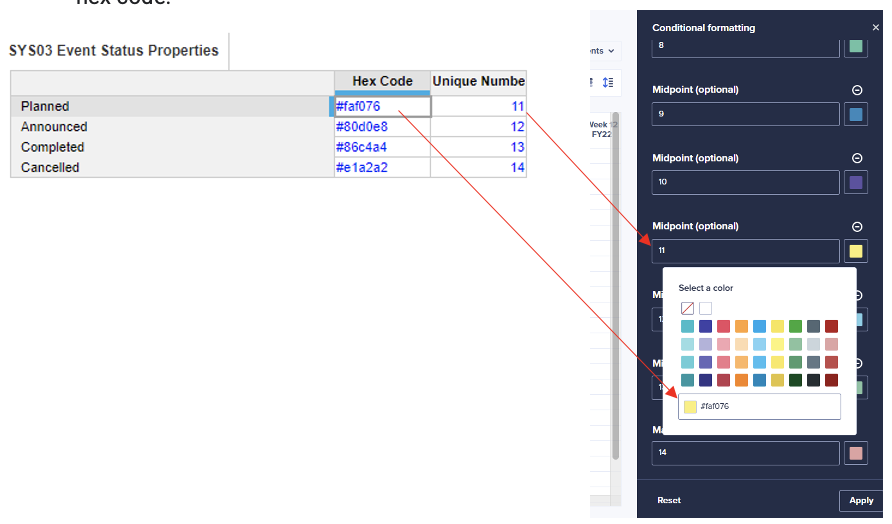
The final step involved creating a Custom View in the New UX. Using CFLI for the conditional formatting, it’s possible to add midpoints until you have the same number as the number of Strategic Objectives. You can then look back at your Strategic Objective system module, fill out each number and its hex code. Note that filling out these midpoints and hex codes is manual and there is currently no way to automate it.
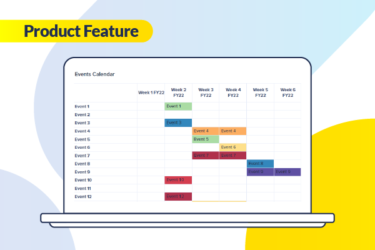
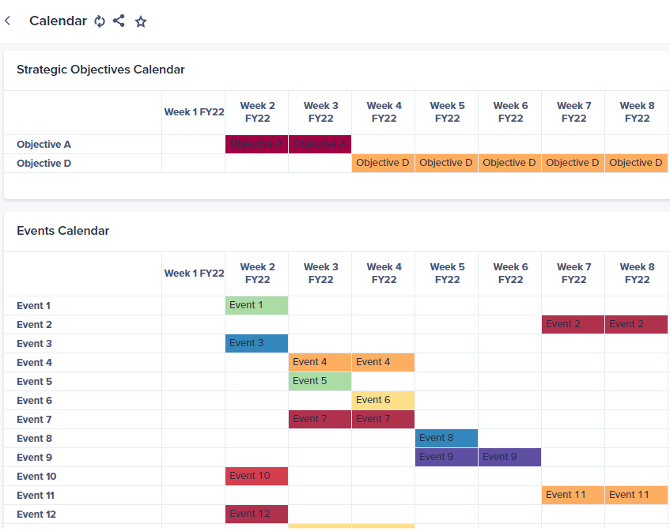
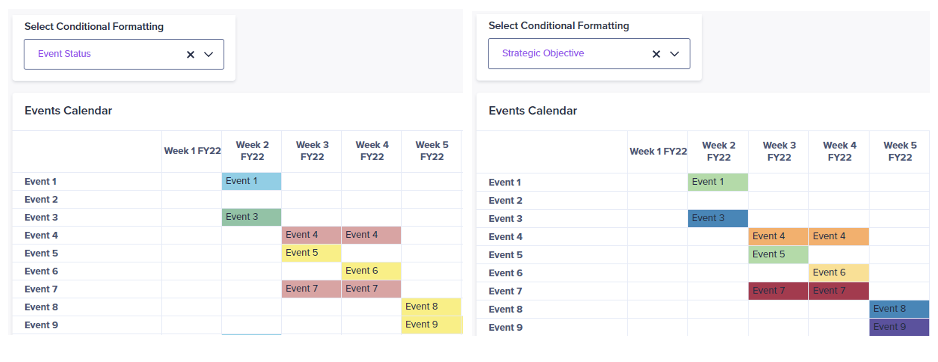
As shown below, it is now easy for the customer to see at a glance when a planned event is lined up with their Strategic Objectives based on colours. e.g. Event 7 aligns with Objective A on Week 3 and Event 4 aligns with Objective D on Week 4.
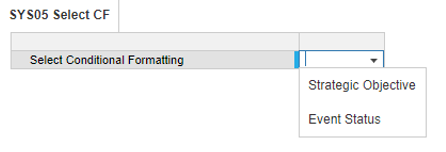
This solution can be taken a step further by using different conditional formatting on the same grid, based on another characteristic of the event. For example, instead of strategic alignment, you may wish to see the status of an event, whether it is planned, active or cancelled, etc.
Technical Solution Documentation:
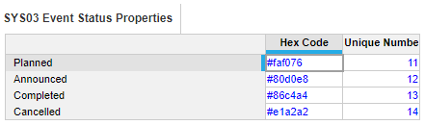
To do this, the first step is to set up a List and System Module for Event Status. Next, create line items for the hex codes and unique numbers. These numbers should be unique, not only from each other, but also from the unique numbers selected in the Strategic Objectives system module.
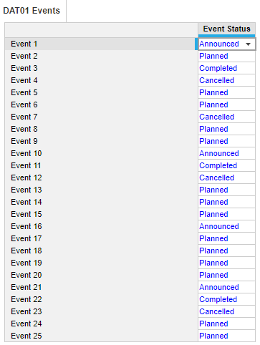
Step two involves mapping each of the planned Marketing Events to the Event Status.
In step three, a new List is created containing each of the different parameters we want to use as conditional formatting, as items; in this example, two items (Strategic Objectives and Event Status). An input line item is then created and formatted as our new parameters list, in order to drive conditional formatting on the UX.
Step four is to modify our CFLI to include an IF statement. If Event Status is selected in the input module, then lookup the unique number in the Event Status system module using the mapping from the Events module. Alternatively, if Strategic Objective is selected in our input module, lookup the unique number in the Strategic Objective system module.
Finally, back in the UX page, add in the input module and modify the Custom View. In the Custom View the new midpoints are added in the conditional formatting. Then look back at the Event Status system module, to fill out each number and its hex code.
As shown below, it’s now possible to easily switch the views between completely customised conditional formatting.